Practicing finger exercises for guitar are much like trying to get your kids to eat their vegetables. While they’re not fun to do or something to look forward to, frequently playing drills, scales and other finger exercises can deliver some huge benefits to even the most seasoned musician. We’ve got some awesome exercises to work out your guitar finger technique whether you play at a beginner or professional level.
You’ll have to know how to read note tablature to use our finger exerciser for guitar guide.
Use Your Metronome
The first thing we would always suggest when starting your exercises is to use your metronome. The reason for this is because the exercises will work much more efficiently if you are sticking to a steady rhythm. It’s a wonderful opportunity to develop your rhythm – something every guitarist needs.
Start with the exercises below and set your metronome at a slow pace. As you get better at the exercises, you can slowly increase the speed.
Hand Position Exercise
The first thing you should practice as a beginner is your hand position. For this one, you don’t need to actually play the guitar, so put your pick down and focus on your hands instead.
-
- Hold the guitar in a natural playing position.
- Place each of your fingers on a fret one at a time, keeping them under the metal bar at the top of each fret.
- Start this process at the 6th string.
- Assign a finger per fret.
- Repeat the process and adapt your hand position until you can play exactly how you want to.
Good Finger Exercises
Now you’ve got your hand position perfected it’s time to move on to actually playing the instrument. Discover some of the best exercises for guitar fingers below.
Chromatic Scales
The first exercise any guitarist should make sure to learn is chromatic scales. This exercise has been made to help you press each fret and string of the guitar down so you can produce the notes you want. The drill helps to improve your finger strength, flexibility, and the overall tone of your playing.
A chromatic scale explores a range of notes step by step. It allows you to play more efficiently and helps you to assign just one digit per fret. Remember to use an alternate (up and down) picking for all the exercises we give you in this guide. You can also move a chromatic scale up and down guitar frets if you miss out playing the open strings.
Pentatonic Scales
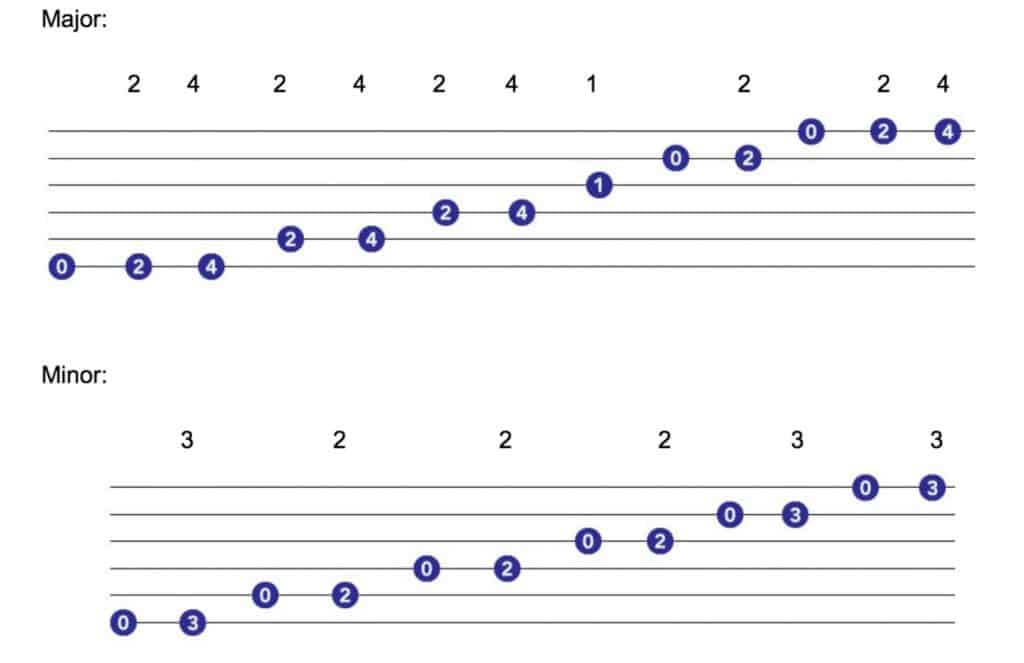
An important exercise to learn for any guitarist is the major and minor pentatonic scales. These scales can be found in a lot of popular music today, and span every genre as well. You can move the pentatonic scale exercise to any position on your guitar. In fact, it’s a good idea to practice them at different locations so you can master the technique.
Playing both the major and minor pentatonic scales as an exercise before you start your real practice is a great way of building up the speed and strength of your guitarist’s fingers.
Pinky Finger Warmup
Now we’re moving on to some harder guitarist finger exercises that would be suitable for musicians at an intermediate level.
We’ll start out with the pinky finger exercise that has been designed to strengthen, you guessed it, your pinky fingers. Some guitarists choose not to use their pinky fingers at all, but having one weak digit means you are making playing a lot harder than it has to be. Guitars are meant to be played using all fingers, so use the exercise below to get that pinky working.
Finger Stretching
The next exercise on our list is to help you stretch your fingers, improving their flexibility. Trying out a new tricky riff may mean we have to stretch our fingers over one fret or two, so using this exercise will help you be prepared for that. You can adapt this exercise any way you want, as this is just one example to stretch out one digit at a time. Start out playing higher up the neck of your guitar, where the frets happen to be smaller to make it a little bit easier.
Finger Strength Building Exercise
You can build strength in both your fingers and your hand by using a legato exercise for your left hand. Legato means long in musical terms, so play these notes as if they were connected to each other. You won’t need to use your right hand at all to play this exercise.
The sound you produce during the exercise all comes from your left hand with both pull-offs and hammer-ons. Because of this, you will need to have both strength and accuracy in your hand to sustain pitches over longer notes. To make the right amount of noise and get the most from the exercise, play as hard and loud as you can without damaging your instrument.
The exercise is designed to tire your hand and fingers out, as well as your arm. If you feel a bit achy afterward, then it’s absolutely done the right job. Strengthening exercises like this one can be played anywhere you want on the neck of the guitar.
Conclusion
Practicing exercises like the ones we’ve mentioned above can do a lot for your musical skills as you start to develop your guitar playing. Like anything to do with playing an instrument, you will need to take the time to learn each exercise first before you can master it. Each exercise has been designed to strengthen and improve the flexibility of each of your digits, so you become a better and well-rounded guitar player.
If you are struggling with guitar exercises and need some more help, why not watch some video tutorials online or even get yourself a teacher? Working with others to improve your playing will only benefit you in the long run. Happy practicing!


